This salmon gets rave reviews whenever I make it. If you are lucky enough to have any left over, it's wonderful served over a salad of field greens with an orange vinaigrette.
1 salmon fillet
2-3 TB extra virgin olive oil
Lemon pepper to taste
Heat oven to 425 degrees.
Rinse salmon in cool water and blot dry with paper towels.
Line a baking sheet with aluminum foil. Spray foil with vegetable oil spray.
Lay salmon on foil, skin side down. Drizzle olive oil over salmon and spread evenly with your finger tips. Sprinkle generously with lemon pepper.
Bake salmon 10-12 minutes until thickest part of salmon is almost ready to flake. Remove from oven and cover loosely with foil. Let sit for 3-5 minutes until thickest part of salmon flakes easily. Serve immediately.
Tuesday, October 11, 2011
Favorite Lentils - adapted from Ina Garten (the Barefoot Contessa)
I was looking for a new lentil recipe when I stumbled across this gem from Ina Garten (a.k.a the Barefoot Contessa). Of all the Ina Garten recipes I've tried, I can't think of anything that hasn't been absolutely delicious. The lentils live up to Ina's reputation.
1⁄2 pound lentils
1⁄4 cup good olive oil
3 cups chopped yellow onions
1 teaspoon fresh thyme leaves (I used 1/2 tsp dry thyme)
2 teaspoons kosher salt
1/2 teaspoon freshly ground black pepper
1 tablespoon minced fresh garlic
1 1⁄2 cups chopped celery (4 stalks)
1 1⁄2 cups chopped carrots (3 carrots)
1 1⁄2 cups chicken stock or chicken broth (don't use bouillon cubes - the end result will be too salty)
2 tablespoons tomato paste
2 tablespoons good red wine vinegar
Place the lentils in a heat-proof bowl and cover with boiling water. Set aside for 15 minutes, then drain.
Meanwhile, heat the oil in a saute pan, add the onions, thyme, salt, and pepper and cook over medium heat for 10 minutes, until the onions are translucent. Add the garlic and cook for 2 more minutes. Add the drained lentils, celery, carrots, chicken stock, and tomato paste. Cover and simmer over low heat for 20 minutes, until the lentils are tender. Add the vinegar and season to taste. Enjoy!
Monday, April 4, 2011
Belgian Waffles for Breakfast
Sundays at the D'Alba home are busy, busy, busy EXCEPT for the first Sunday in April and the first Sunday in October. And then, everything comes to a halt except listening to our prophet and general authorities speak in General Conference. How I look forward to these Sundays!
Living in the East, Conference begins at noon - which gives us hours, yes hours, with no obligations on a Sunday morning. On such a morning, what could be better than piping hot Belgian waffles? Not much. (The hot buttermilk-coconut syrup, bananas, and whipped cream kind of put these over the top, in a really good way.) This recipe comes together incredibly fast which means, of course, getting out of the kitchen quickly.

Belgian Waffles
2 cups all-purpose flour
2 teaspoons baking powder
2 TB powdered sugar
pinch of salt
1/4 cup butter or margarine, melted and cooled
2 cups milk
3 eggs, separated
1 TB vanilla
Preheat the waffle iron. In a large bowl, whisk together flour, baking powder, powdered sugar and salt. Add butter, milk, vanilla and egg yolks and whisk to combine. In a separate bowl, beat the egg whites until soft peaks form. Gently fold the egg whites into the batter, mixing just until most of the egg whites are incorporated.
Brush waffle iron with oil. Ladle batter into waffle iron and bake according to the directions for your waffle iron. Makes about 7 waffles.
NOTE: Waffles are best eaten "hot off the iron" - but if you HAVE to hold them so everyone can eat at once, keep them in a warm oven. Heat oven to 250 degrees. Place a metal cooling rack in a jelly roll pan in the oven. As waffles are finished baking, place them in a single layer on the prepared pan in the oven. But trust me on this one - once you start cooking waffles, good luck getting people to wait until the waffles all are cooked.
Sunday, March 27, 2011
Instant Sunshine - kind of
It's been a cold dark winter, and it seems like it's been going on forever. . . well, at least since last October or so. And while I'm ready for spring, mother nature just isn't cooperating. Until then, I've added a splash of color with a new tablecloth. . . or two.

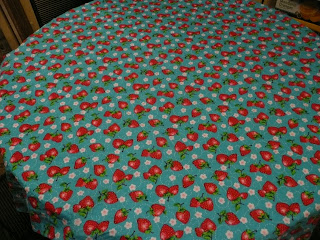
With 45 inches of bright fabric and a few minutes of sewing, I get a pop of color that brightens my spirits. Buy the fabric on sale, and my spirits are even brighter.
For each tablecloth:
Purchase 45 inches (1 1/4 yards) of 44/45 inch cotton or polyester/cotton fabric. If there are printing marks ( color squares or writing) on the selvages, you will need to trim and hem those ends. Otherwise, turn the cut ends under twice and sew with a straight seam. I find it easiest to press each end under about 1/4 inch, then fold the fabric again and press it. By taking a few minutes to press the hems before sewing them, I don't have to pin the hem. Anything that makes life a little easier works for me.
These tablecloths can be used by themselves on small kitchen tables. For larger tables, put the new tablecloth over a solid color tablecloth. It makes a bright accent. For about $5.00 per tablecloth (with fabric purchased on sale), I'm smiling each time I walk through the kitchen.
Saturday, March 26, 2011
Homemade Microwave Popcorn Packs
 Last week I did a stress management workshop during a multi-stake singles conference. Because both men and women attended, I wanted a favor that all could enjoy. And because the workshop was on stress management, I was looking for a favor that wouldn't cause any guilt or additional stress. These microwave popcorn packets seemed to fill the bill.
Put 1/3 cup popcorn in a brown paper lunch sack. Fold down the top twice and tape it. Wrap each bag with ribbon and attach a flower cut from cardstock. Slide instructions under the ribbon on the back of the packet.
I customize the instructions based on the event. Super Stress Poppers could easily be changed to Birthday Poppers, or "Here's to a great pop" for Father's Day. . . you get the idea.
There you go - an easy, inexpensive favor that can be color coordinated to any party or event you are hosting.
If making the packets to cook microwave popcorn for yourself, you don't even need to tape the bag. Fold down the top of the bag twice, lay the bag flat in your microwave oven, and microwave 1-3 minutes or until the popping slows to 1-2 pops per second. Add desired seasonings and enjoy. (And for the frugal among us - you can re-use the lunch sack for additional batches of popcorn.)
Friday, March 25, 2011
Relaxing Foot Soak
 Here's an easy foot soak that also makes a nice favor. I called this version "De-stressed Soles" because I handed them out at a stress management workshop. You could call it anything you want.
I use 1/4 cup of the mix in a 3" x 4" plastic bag. Lately, I've used jewelry bags from WalMart. They are inexpensive - but they don't seal at all well. This means you need to fold down the top of the bag and staple it before stapling on the label (otherwise the mix leaks out of the bag). The decoration is a piece of folded ribbon stapled to the back at the same time the label is stapled on.
Relaxing Foot Soak
1 1/4 cups Epsom salts
1 1/4 cups kosher salt
1/4 cup baking soda
1/4 cup cornstarch
Combine all ingredients in a large bowl. Stir with a whisk until combined. Pour into jars or small bags and use within a few weeks.
Each recipe makes 10-11 individual packets using 1/4 cup of the mix in each bag.
Homemade Bagels

Homemade bagels topped with Italian cheeses.
In the planning for a young men campout tonight, Mark was assigned to bring breakfast. It had to be something quick to put together, that didn't require any cooking, created minimal mess, and would be fast to eat. Bagels sounded like the plan until I priced them at the local grocery store - 75 cents EACH. And when feeding boys and men, you know that 1 bagel per person is just not going to be enough.
Recently I read a post on the Sisters Cafe blog (sisterscafe.blogspot.com) that referred to an older post (January 24, 2009 if you want to find it for yourself) for homemade bagels. I will never purchase bagels again! These were easy to make and taste phenomenal. And you should smell the house while they're baking. Oh, and the cost for 12 bagels. . . less than a dollar.
Following is the recipe for bagels adapted from Sisters Cafe - try it, you'll like it.
Homemade Bagels
2 c. very warm water
1 1/2 TB instant dry yeast
3 Tbs granulated sugar, plus 1 Tb
5-6 c. high gluten or all-purpose flour
2 tsp salt
In the bowl of an upright mixer (KitchenAid or Bosch), combine water and 3 TB sugar. Add 4 cups flour, yeast, and salt. Mix with dough hook until combined and makes a soft dough. Add 1 to 1 1/2 cups additional flour, 1/2 cup at a time, to make a stiff dough. Knead in the mixer for at least 5 minutes until the dough is smooth and no longer sticky. This dough should be stiffer than regular yeast bread dough. (If the dough is too heavy for your mixer, you will need to finish stirring in the flour and kneading the dough by hand.)
Spray a large bowl with Pam. Place the dough in the bowl. Cover and let rise in a warm, draft-free spot until almost doubled, about an hour.
Remove from the bowl and punch down the dough. Divide into 12 equal pieces. Roll each piece into a log about 6 inches long. Fold the ends over each other and pinch together. Spray a baking sheet with Pam, place the bagels on the sheet, cover with a towel, and let rest about 20-30 minutes. The dough will raise, but won't be doubled.

Bagels have "rested" for 30 minutes and are ready to boil.
While dough is resting, preheat oven to 400 degrees. Bring a large pot of water to a boil and add 1 TB sugar. (This takes a while. I just let the water boil until I was ready to use it.)Spray a baking sheet with Pam and sprinkle with cornmeal.
Working in batches (I was able to boil 3 bagels at a time), add the bagel to the water and boil, turning, for 30 seconds to 1 minute. I used a large flat pancake spatula with holes in it to turn the bagels and to lift them out of the water. I turned each bagel completely twice, with each turn lasting about 10 seconds. Then lift out of the water and place on the prepared sheet. The bagels will look lumpy. At this point, top with kosher salt, sesame seeds, poppy seeds, or leave plain.

Bagels boiling in water. Turn every 10-15 seconds.

These have been boiled and are ready to be baked.
Bake 20-25 minutes. If adding cheese (I used an Italian blend of mozzarella, provolone, asiago, and parmesan), remove from the oven, top with cheese, then return to oven until cheese is melted and bubbly - about 4 minutes.
Remove from the oven and let cool on a wire rack.

Just out of the oven - warm bagels with a dusting of kosher salt.
Bacon-Onion Cream Cheese Spread
2 (8-ounce) packages cream cheese, at room temperature
1/4 cup half-n-half or cream
1 bunch green onions, sliced (use all of the white and about 2 inches of the green stems)
1 TB finely minced onion (use more or less to taste, depending on how strong the onions are)
1/2 cup diced, cooked, crisp bacon
Combine cream cheese and cream with mixer until smooth. Add remaining ingredients and mix. Add salt or onion salt to taste. Chill several hours or overnight before serving.
A few notes about the bagels:
1. Yeast: I use instant yeast for almost all my baking. I love SAF Instant yeast when I can find it, otherwise I use Fleischman's Instant yeast. The yeast comes in a brick-like package until it's opened. Once I open the package, I put the yeast in a plastic container in the fridge and it seems to last a long time. I've never had a problem with the yeast. The instant yeast can be mixed in with the flour, which saves the step of "proofing" the yeast before adding the flour. It's also less sensitive to heat, so I don't need to be too careful with the temperature of the water. If you are using regular yeast, go to the Sisters Cafe blog and follow their instructions.
2. Flour: High gluten flour adds a chewiness to bagels, pizza crust, and french bread that is hard to get with all-purpose flour. Sam's Club sells huge bags of high gluten flour for the best price I've found. The high gluten flour seems to absorb more water than all-purpose flour, which means I usually end up using a little less flour than when using all-purpose flour.
3. Mixer: The Bosch handled a double batch of dough without any problems - including kneading the dough for about 7 minutes. Based on experience, I wouldn't try a double recipe in the KitchenAid.
4. Baking: I baked 2 trays at a time and switched racks after about 15 minutes. Then cooked each pan about 10 minutes longer. (If adding cheese, remove bagels 5 minutes before cooking time has ended, add cheese, and return to oven to finish baking.) I have a gas oven that I'm still trying to get used to, so your time may be more or less than mine. Bagels are done when brown on the bottom and golden brown on the top. If you are concerned whether they are done, remove one bagel from the pan and cut into it.
Subscribe to:
Posts (Atom)